Electric Shaver Care: Cleaning and Maintaining for Longevity
Do you want a clean, smooth shave every time? Of course you do! That’s why it’s essential to take care of your electric shaver. Regular cleaning and maintenance not only ensure optimal performance but also extend the lifespan of your trusty grooming companion.
In this article, we’ll delve into the importance of shaver care, the essential tools for cleaning, a step-by-step guide on how to clean your electric shaver, tips for maintaining its peak performance, troubleshooting common problems, and more. So, let’s dive in and discover how to keep your electric shaver in tip-top shape!
Understanding the Importance of Regular Shaver Maintenance

Maintaining your electric shaver is more than just a chore; it’s a critical aspect of ensuring its longevity and performance. Neglecting proper care can lead to a host of issues, impacting both the functionality of the device and the quality of your shaving experience. Let’s delve into why regular shaver maintenance is essential:
The Impact of Neglecting Shaver Care
Neglecting shaver care can have far-reaching consequences, affecting both the device and your skin. When not properly maintained, electric shavers can accumulate dead skin cells, dirt, and debris, leading to clogged blades and reduced shaving efficiency. This buildup can also harbor bacteria, increasing the risk of skin infections and razor bumps. Additionally, neglecting maintenance can cause blades to become dull over time, resulting in an uneven shave and skin irritation.
Benefits of Regular Cleaning and Maintenance
Regular cleaning and maintenance are essential for maximizing the lifespan and performance of your electric shaver. By incorporating these practices into your grooming routine, you can reap several benefits:
- Optimal Shaving Performance: Regular cleaning removes debris and buildup from the shaver head, ensuring that blades remain sharp and effective. This promotes a closer and more comfortable shave, reducing the likelihood of skin irritation and razor burn.
- Extended Lifespan: Proper maintenance helps preserve the integrity of the shaver’s components, preventing premature wear and tear. By keeping the device clean and well-maintained, you can prolong its lifespan and avoid the need for frequent replacements, ultimately saving you money in the long run.
- Hygienic Grooming: Cleaning your electric shaver regularly helps eliminate bacteria and germs that can accumulate on the device. This is particularly important for individuals with sensitive skin, as it reduces the risk of skin infections and other dermatological issues.
- Consistent Performance: Regular maintenance ensures that your electric shaver operates at peak performance levels. Clean blades and a well-maintained shaving unit contribute to a smoother and more efficient shaving experience, allowing you to achieve a consistently close shave with minimal effort.
Regular shaver maintenance is essential for preserving the functionality, performance, and hygiene of your electric razor. By incorporating cleaning and maintenance into your grooming routine, you can enjoy optimal shaving results while prolonging the lifespan of your device. Remember, a well-maintained shaver not only delivers a closer shave but also promotes healthier and happier skin.
Essential Tools for Electric Shaver Cleaning
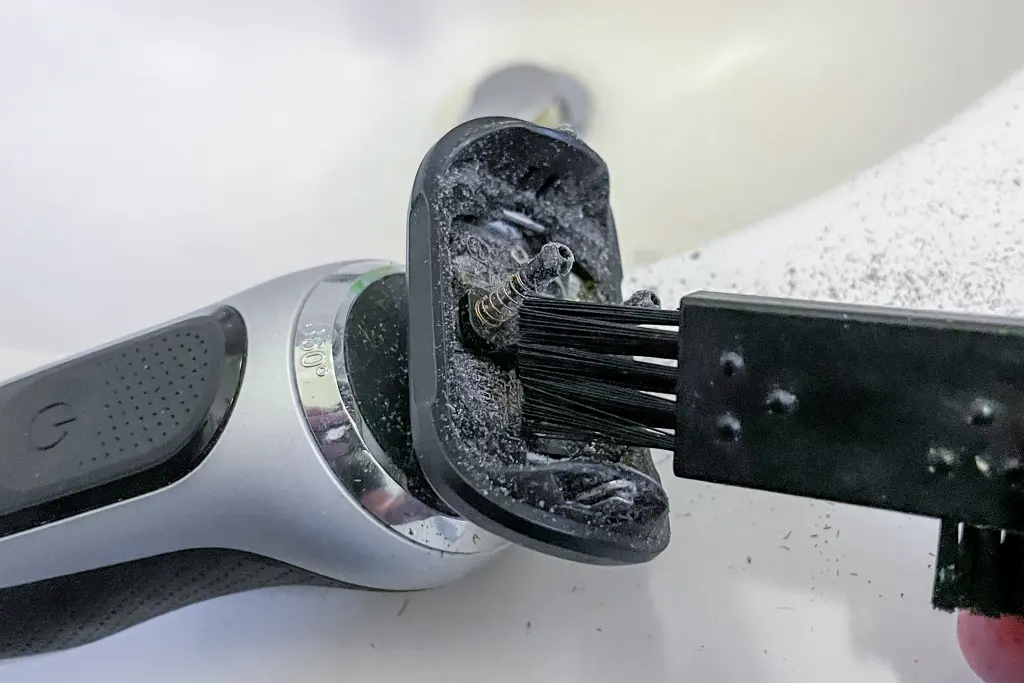
Now that you understand the importance of shaver care, let’s explore a few drops of the essential tools you’ll need to keep your electric shaver in pristine condition.
When it comes to maintaining your electric shaver, having the right tools can make all the difference. While the shaver itself is the star of the show, there are a few unsung heroes that play a crucial role in keeping it clean and performing at its best. These tools not only help remove debris and hair but also ensure that the shaver remains in optimal condition for a longer period of time.
Cleaning Brushes and Their Uses
A cleaning brush is a must-have tool for removing debris and hair from your shaver. The bristles are designed to reach deep into the nooks and crannies, ensuring a thorough clean. Using a cleaning brush regularly prevents clogging and maintains the cutting efficiency of the shaver. Don’t underestimate the power of this small but mighty tool!
When it comes to a thorough cleaning of your electric shaver, a cleaning brush is your best friend. Its bristles are specially designed to effectively remove any trapped hair, dead skin cells, or product buildup from the shaver’s blades and foils. By regularly using a cleaning brush, you can ensure that your shaver remains hygienic and free from any potential irritants.
Not only does a cleaning brush help in maintaining the cleanliness of your shaver, but it also plays a vital role in preserving its performance. By removing any debris or hair that may have accumulated, the brush ensures that the cutting elements and shaving device can function optimally, providing you with a close and comfortable shave every time.
Lubricating Oils and Their Role
Lubricating oils are indispensable when it comes to the maintenance of your electric shaver. These specially formulated oils help reduce friction between the blades and foils, ensuring a smooth glide and preventing premature wear.
Applying a drop of oil regularly to the cutting elements of manual razor will not only enhance the shaver’s performance but also protect it from rust and corrosion. Remember, a well-lubricated shaver is a happy shaver!
When it comes to the longevity of your electric shaver, lubricating oils are a game-changer. These oils serve as a protective barrier, reducing friction between the blades and foils. By doing so, they not only ensure a smooth and effortless shave but also prevent premature wear and tear of the shaver’s components.
Regularly applying a drop of lubricating oil to the cutting elements of your shaver can significantly enhance its performance. The oil helps the blades glide effortlessly over your skin, reducing any discomfort or irritation that may occur during the shaving process.
Additionally, the lubricating oil acts as a shield, protecting the shaver’s body from rust and corrosion, which can ultimately extend its lifespan.
When choosing a lubricating oil for your electric shaver, it’s important to opt for one that is specifically designed for this purpose. These oils are formulated to provide the right viscosity and lubrication properties, ensuring optimal performance and protection for your shaver.
By incorporating cleaning brushes and lubricating oils into your electric shaver maintenance routine, you can ensure that your shaver remains in top-notch condition for years to come. These tools may seem small and simple, but their impact on the performance and longevity of your shaver is undeniable. So, don’t overlook the importance of these essential tools and give your electric shaver the care it deserves!
Step-by-Step Guide to Cleaning Your Electric Shaver

Now that you have all the necessary tools, let’s dive into a step-by-step guide on how to clean and dry shave with your electric shaver effectively.
Pre-Cleaning Preparations
Before you start cleaning, make sure your shaver is turned off and unplugged. This eliminates the risk of accidental activation and keeps you safe. If your shaver has a removable head or a cleaning station, follow the manufacturer’s instructions to detach it from the main body. This will allow you to access the cutting elements easily and ensure a thorough clean.
Now, let’s talk about the importance of pre-cleaning preparations. By turning off and unplugging your electric shaver, you are taking a crucial safety measure. Accidental activation can lead to injuries, so it’s always better to be safe than sorry.
Additionally, detaching the removable head or cleaning station is essential for a thorough clean. This step ensures a deep clean so that you can reach all the nooks and crannies of your shaver, leaving no hair or debris behind.
Detailed Cleaning Process
Using your cleaning brush, gently remove any loose hairs and debris from hard surface of the shaver head. Be thorough and careful not to damage the delicate foils and blades. Next, rinse the shaver head under running water to dislodge any remaining particles.
Avoid using hot water rubbing alcohol, or liquid soap as it can damage the foils. For a deeper clean, you can also use a specialized cleaning solution recommended by the manufacturer. Once the head is clean, shake off the excess water and let it air dry before reassembling.
Let’s delve deeper into the detailed cleaning process. The cleaning brush plays a crucial role in removing loose hairs and debris from the shaver head. By gently brushing the head, you ensure that no hair or dirt is left behind, allowing for optimal performance. When rinsing the shaver head under running water, it’s important to use cold or lukewarm water.
Hot water can cause damage to the foils, reducing the lifespan of your shaver. If you want to go the extra mile, using warm water or a specialized cleaning solution recommended by the manufacturer can provide a deeper clean, ensuring that your shaver is free from any stubborn particles.
After cleaning, it’s important to let the shaver head air dry completely before reassembling. This prevents any moisture from causing damage and ensures that foil head of your shaver is ready for its next use.
Post-Cleaning Steps
After deep cleaning your electric shaver, it’s essential to follow a few post-cleaning steps to ensure its longevity.
First, reattach the head to the shaver body, ensuring a secure fit. Then, apply a drop of lubricating oil to the cutting elements and turn on the shaver for a few seconds to distribute the oil evenly.
Finally, wipe the exterior of the shaver with a clean, dry cloth to remove any remaining moisture or residue. Your shaver is completely dry and now ready for its next grooming session!
Now, let’s discuss the post-cleaning steps in detail. Reattaching the head to the shaver body is crucial to maintain the stability and functionality of your electric shaver. A secure fit ensures that the cutting elements work efficiently, giving you a smooth and comfortable shaving experience. Applying a drop of lubricating oil to the cutting elements is another important step.
This helps reduce friction and wear on the blades, prolonging their lifespan. By turning on the shaver for a few seconds, you allow the oil to distribute evenly, ensuring optimal performance. Finally, wiping the exterior of the shaver with a clean, dry cloth removes any remaining moisture or residue from apply oil, keeping your shaver in pristine condition.
Maintaining Your Electric Shaver for Optimal Performance

Cleaning your electric shaver is only part of the equation. To maintain its optimal performance, there are a few additional steps you should take.
Regular Lubrication and Its Importance
Regular lubrication is crucial for keeping your electric shaver in top shape. After each cleaning, make it a habit to apply a drop of lubricating oil to the cutting elements. This simple step will not only ensure a smooth and comfortable shave but also extend the lifespan of your shaver.
Replacing Blades and Foils
Blades and foils are the heart of your electric shaver. Over time, they will naturally wear out and become less efficient. When you begin to notice a decline in performance, it’s a good indicator that it’s time to replace them.
A general rule of thumb is to clean manually replace the blades and foils every 12 to 18 months, depending on usage. By doing so, you’ll restore your shaver’s cutting power, resulting in a closer and more enjoyable shave.
Troubleshooting Common Electric Shaver Problems

Even with regular care, electric shavers can sometimes encounter issues. Here are a couple of common problems and how to address them:
Dealing with Battery Issues
If your electric shaver is not holding a charge or the battery performance has significantly declined, it may be time to replace the rechargeable battery. Consult the manufacturer’s instructions or contact customer support for proper guidance in replacing the battery. It’s important to note that not all electric shavers have user-replaceable batteries, so it’s best to check beforehand.
Addressing Overheating Problems
Overheating during usage can be a sign of excessive strain on the motor or a buildup of debris inside the shaver. Start by cleaning the shaver thoroughly as explained earlier. If the problem persists, it may be an indication of a more serious issue. Contact the manufacturer or a professional shaver technician for a thorough inspection and repair.
Tips for Extending the Life of Your Electric Shaver

Now that you’re equipped with the knowledge of shaver care and maintenance, here are a few additional tips to help you get the most out of your electric shaver:
Proper Storage and Handling
When you’re not using your electric shaver, make sure to store it in a cool and dry place. Avoid leaving it in direct sunlight or in humid environments, as this can cause damage to the electronic components. Additionally, handle your shaver with care to prevent accidental drops or impacts that may affect its performance.
Avoiding Common Mistakes in Shaver Maintenance
While it’s essential to clean and maintain your electric shaver regularly, there are a couple of mistakes to avoid.
Firstly, never use harsh chemicals or abrasive materials to clean your shaver, as they can damage the delicate foils and blades. Stick to the recommended cleaning solutions and tools.
Secondly, resist the temptation to submerge your shaver heads fully in water, as this can cause irreparable damage to the electronic components. Stick to rinsing the head under running water as prescribed in the cleaning process.
Concluding Thoughts on Electric Shaver Care and Maintenance

Congratulations! You are now well versed in the art of cleaning and maintaining your electric shaver for longevity. By following the steps outlined in this article and integrating regular shaver care into your grooming routine, you’ll ensure a smooth and enjoyable shaving experience every time.
Remember, a well-maintained electric shaver not only provides an exceptional performance but also saves you money in the long run by prolonging its lifespan. So, go ahead and give your shaver the TLC it deserves, and it will reward you with a flawless shave for years to come!

